Add New vCenter Resources and Advanced Features
vOneCloud can manage an unlimited number of vCenters. Each vCenter is going to be represented by an vOneCloud host, which in turn abstracts all the ESX hosts managed by that particular instance of vCenter.
The suggested usage is to build vOneCloud templates for each VM Template in each vCenter. The built in scheduler in vOneCloud will decide which vCenter has the VM Template needed to launch the VM.
It is important to note that there are different behavior of the vCenter resources when deleted in OpenNebula. The following resources are NOT deleted in vCenter when deleted in OpenNebula:
- VM Templates
- Datastores
The following resource are deleted in vCenter when deleted in OpenNebula:
- Images
- Virtual Machines
- Networks
If resources are imported in vOneCloud rather than created through it, they won’t be deleted in vCenter if deleted in vOneCloud.
Add New vCenter Cluster
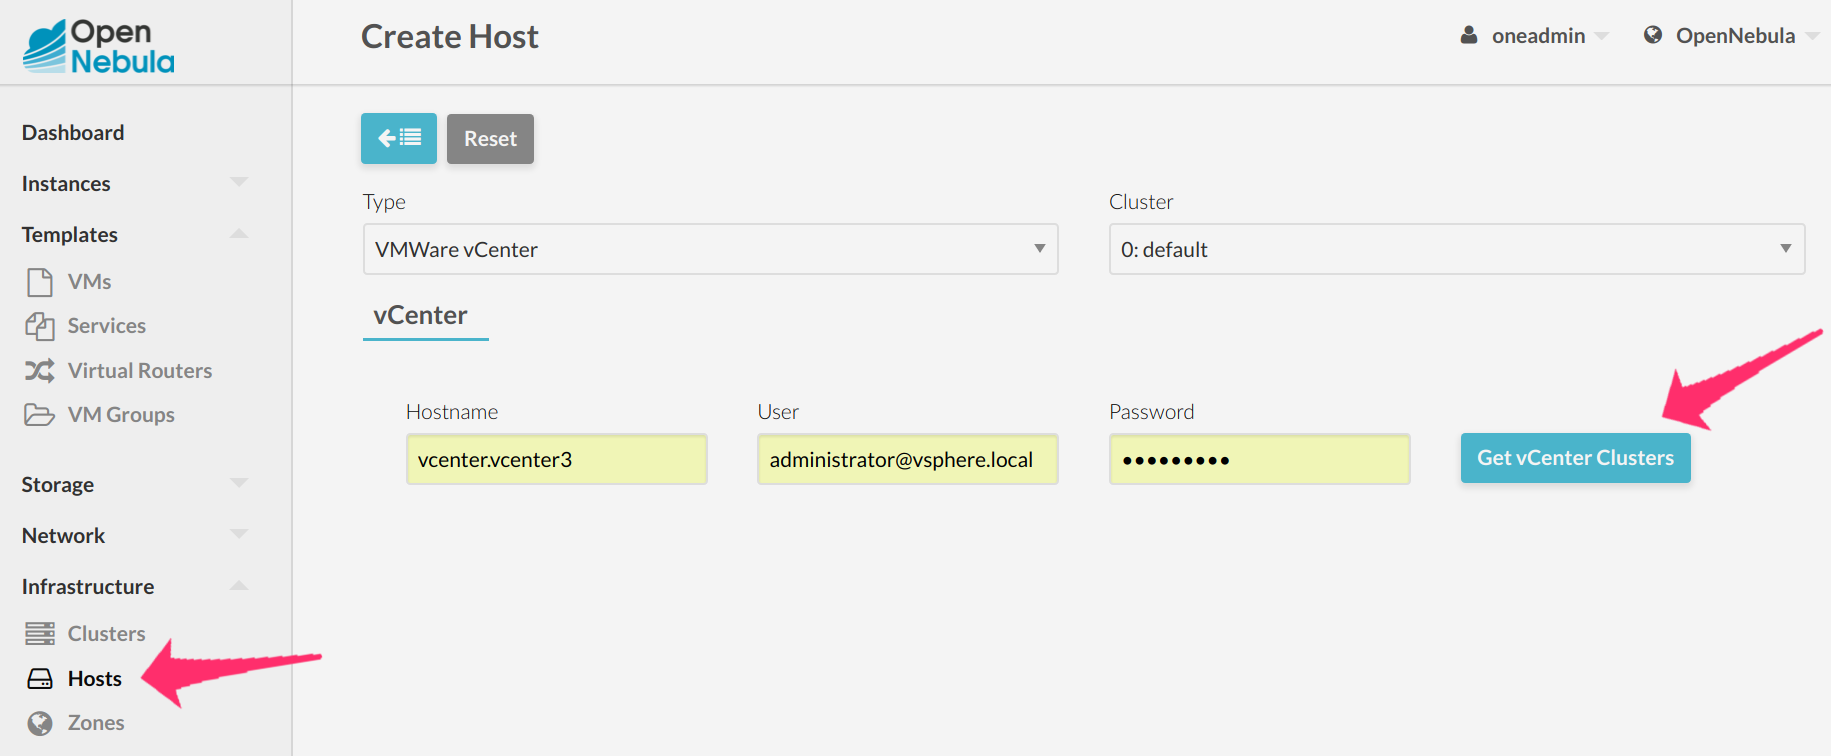
The mechanism to add a new vCenter is exactly the same as the one used to import the first one into vOneCloud. It can be performed graphically from the vCenter View:
Note
vOneCloud will create a special key at boot time and save it in /var/lib/one/.one/one_key. This key will be used as a private key to encrypt and decrypt all the passwords for all the vCenters that vOneCloud can access. Thus, the password shown in the vOneCloud host representing the vCenter is the original password encrypted with this special key.
Add New / Update VM Template
Let’s see an example:
To avoid misunderstandings, there are two VM templates we will refer to: the vOneCloud VM Templates and the vCenter VM Templates. The formers are created in the vOneCloud web interface (Sunstone), whereas the latter are created directly through the vCenter Web Client.
A cloud administrator builds two vOneCloud templates to represent one vCenter VM Template available in vCenterA and another available in vCenterB. As previous work, the cloud administrator creates two vCenter VM templates, one in each vCenter.
To create a vOneCloud VM Template representing a vCloud VM Template, you have to choices:
- Import an existing vCenter VM Template
- Create a new VM Template manually providing a reference to a vCenter VM Template
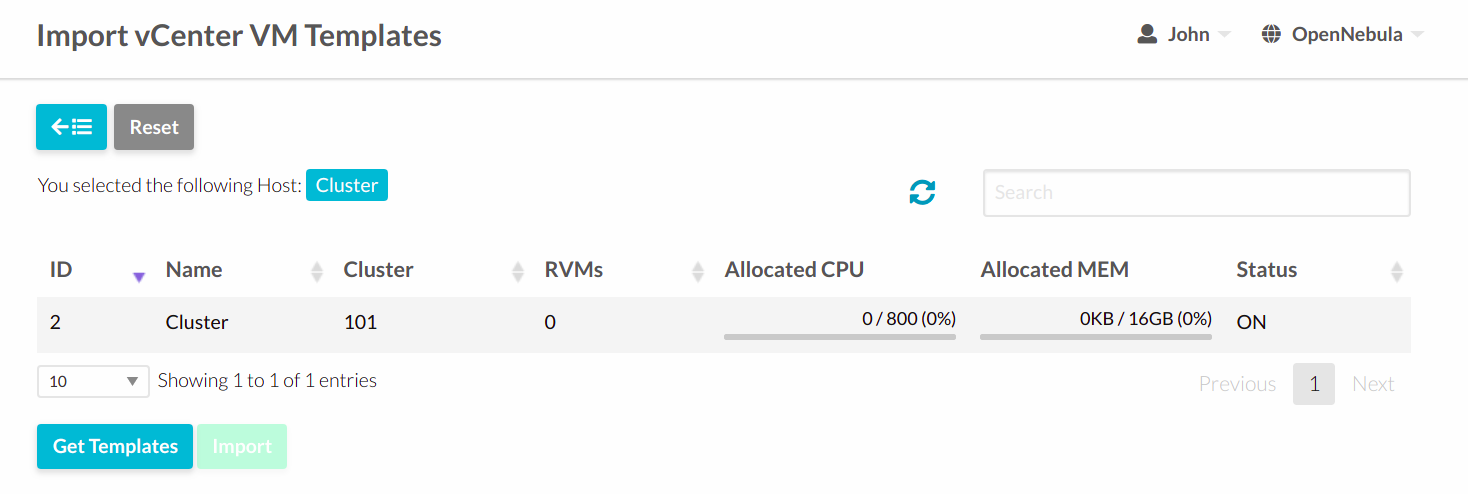
You can import a vCloud VM Template using the Import button and providing your vCenter’s hostname or IP address and the credentials for a user with the required privileges. Then, select the templates you want to import and click the Import Selected Templates button.
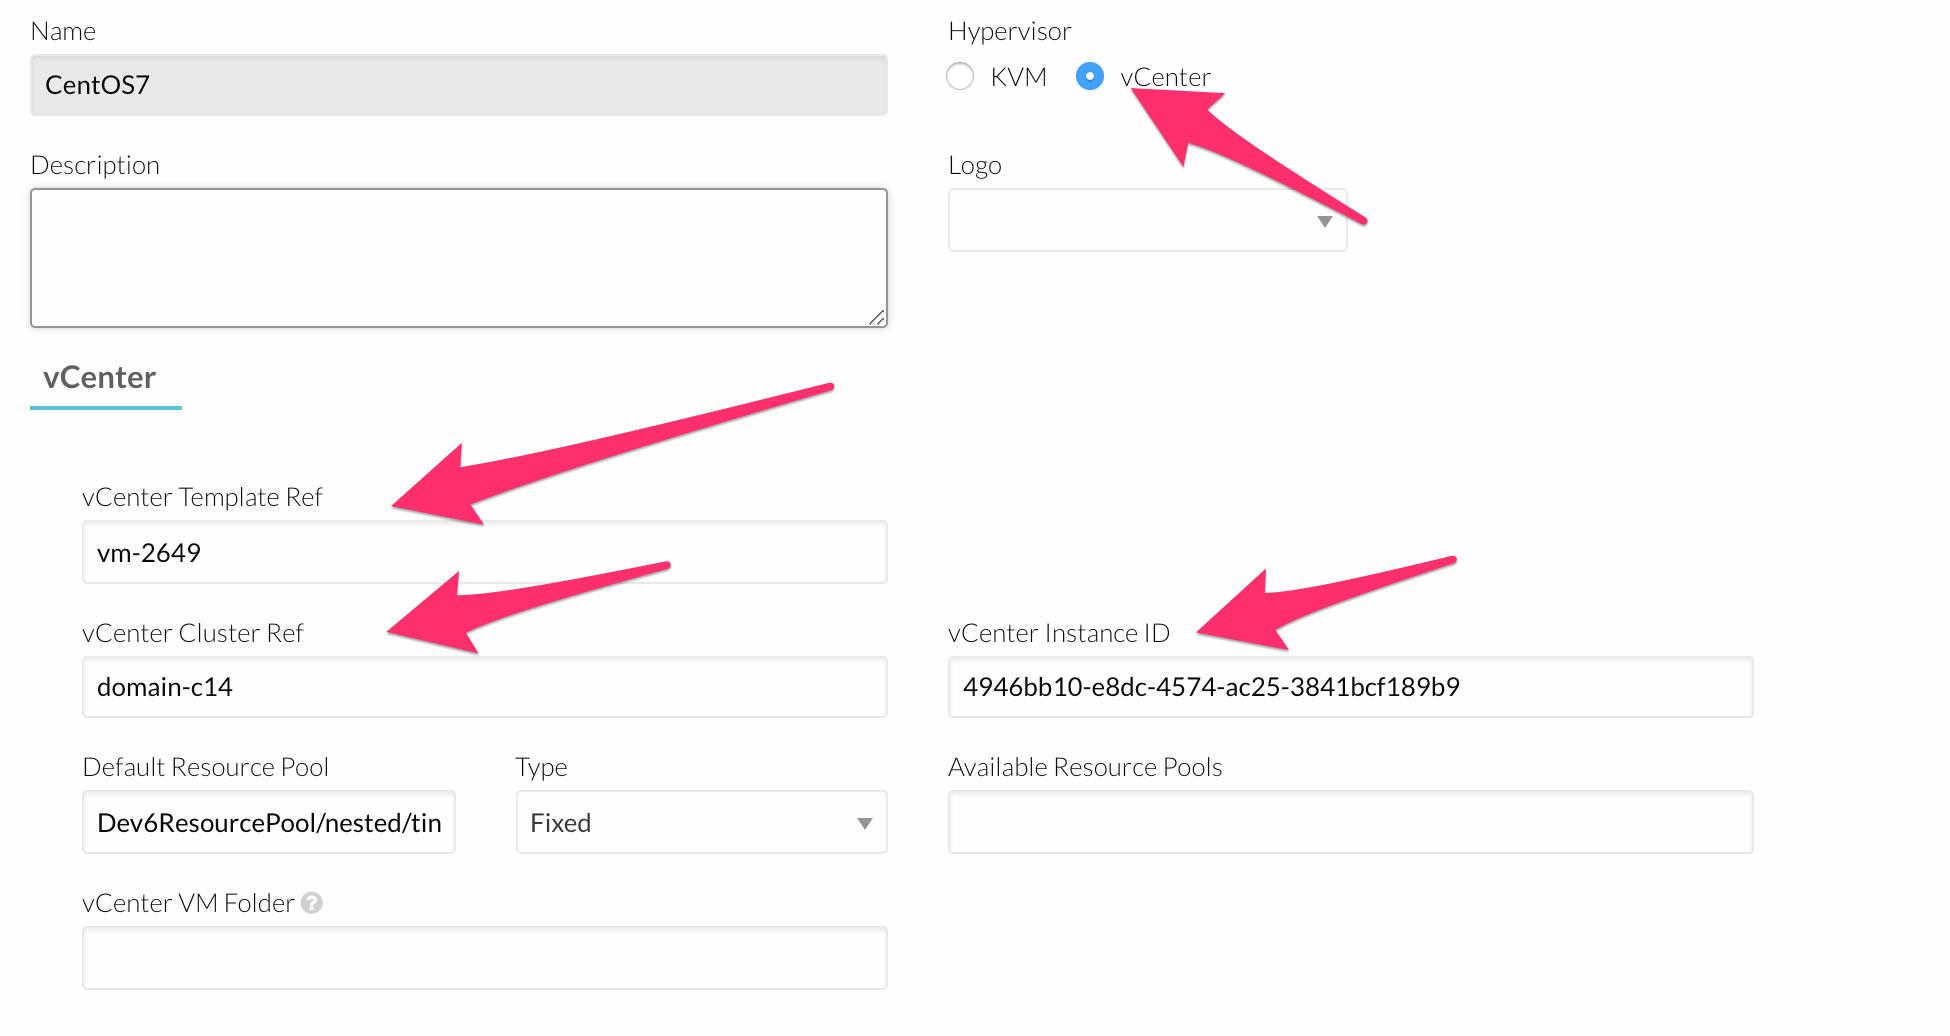
If you want to create the vOneCloud VM Template manually, log in into Sunstone as CloudAdmin user as in explained here, proceed to the
Templates -> VMs, and click on the + sign. Select vCenter as the hypervisor, and type in the vCenter Instance ID, the vCenter Templated Ref and the vCenter Cluster Ref (more information here). You can also set a capacity (CPU and Memory) that would be honored at the time of instantiating the VM. In the Scheduling tab you can select the hostname of the specific vCenter. The Context tab allows to pass information onto the VM to tailor it for its final use (read more about it here). In Network tab a valid Virtual Network (see below) can added to the VM, possible values for the MODEL type of the network card are:
- virtuale1000
- virtuale1000e
- virtualpcnet32
- virtualsriovethernetcard
- virtualvmxnetm
- virtualvmxnet2
- virtualvmxnet3
Create one VM Template with informaton about host vCenterA. Repeat for vCenterB.
If a user instantiates one of these templates, the vOneCloud scheduler will pick the right vCenter in which to instantiate the VM Template.
Using the automated process for importing vCenter infrastructures, vOneCloud will generate the above template for you at the time of importing vCenter.
The following advanced features can be used in the VM Templates and VMs.
VM Instantiate to Persistent
At the time of deploying a VM Template, a flag can be used to create a new VM Template out of the VM.
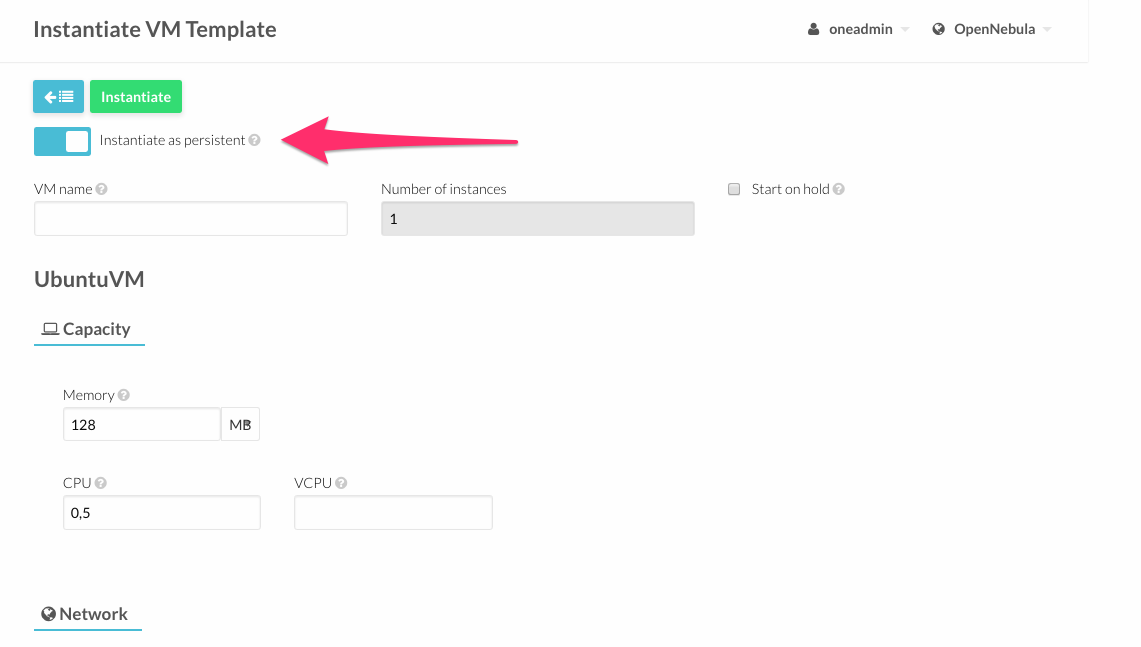
Whenever the VM life-cycle ends, vOneCloud will instruct vCenter to create a new vCenter VM Template out of the VM, with the settings of the VM including any new disks or network interfaces added through vOneCloud. Any new disk added to the VM will be saved as part of the template, and when a new VM is spawned from this new VM Template the disk will be cloned by vOneCloud (ie, it will no longer be persistent).
This functionality is very useful to create new VM Templates from a original VM Template, changing the VM configuration and/or installing new software, to create a complete VM Template catalog.
Note
A new vOneCloud VM Template will be created pointing to this new VM Template, so it can be instantiated through vOneCloud. This new vOneCloud VM Template will be pointing to the original template until the VM is shutdown, at which point it will be converted to a vCenter VM Template and the vOneCloud VM Template updated to point to this new vCentre VM Template.
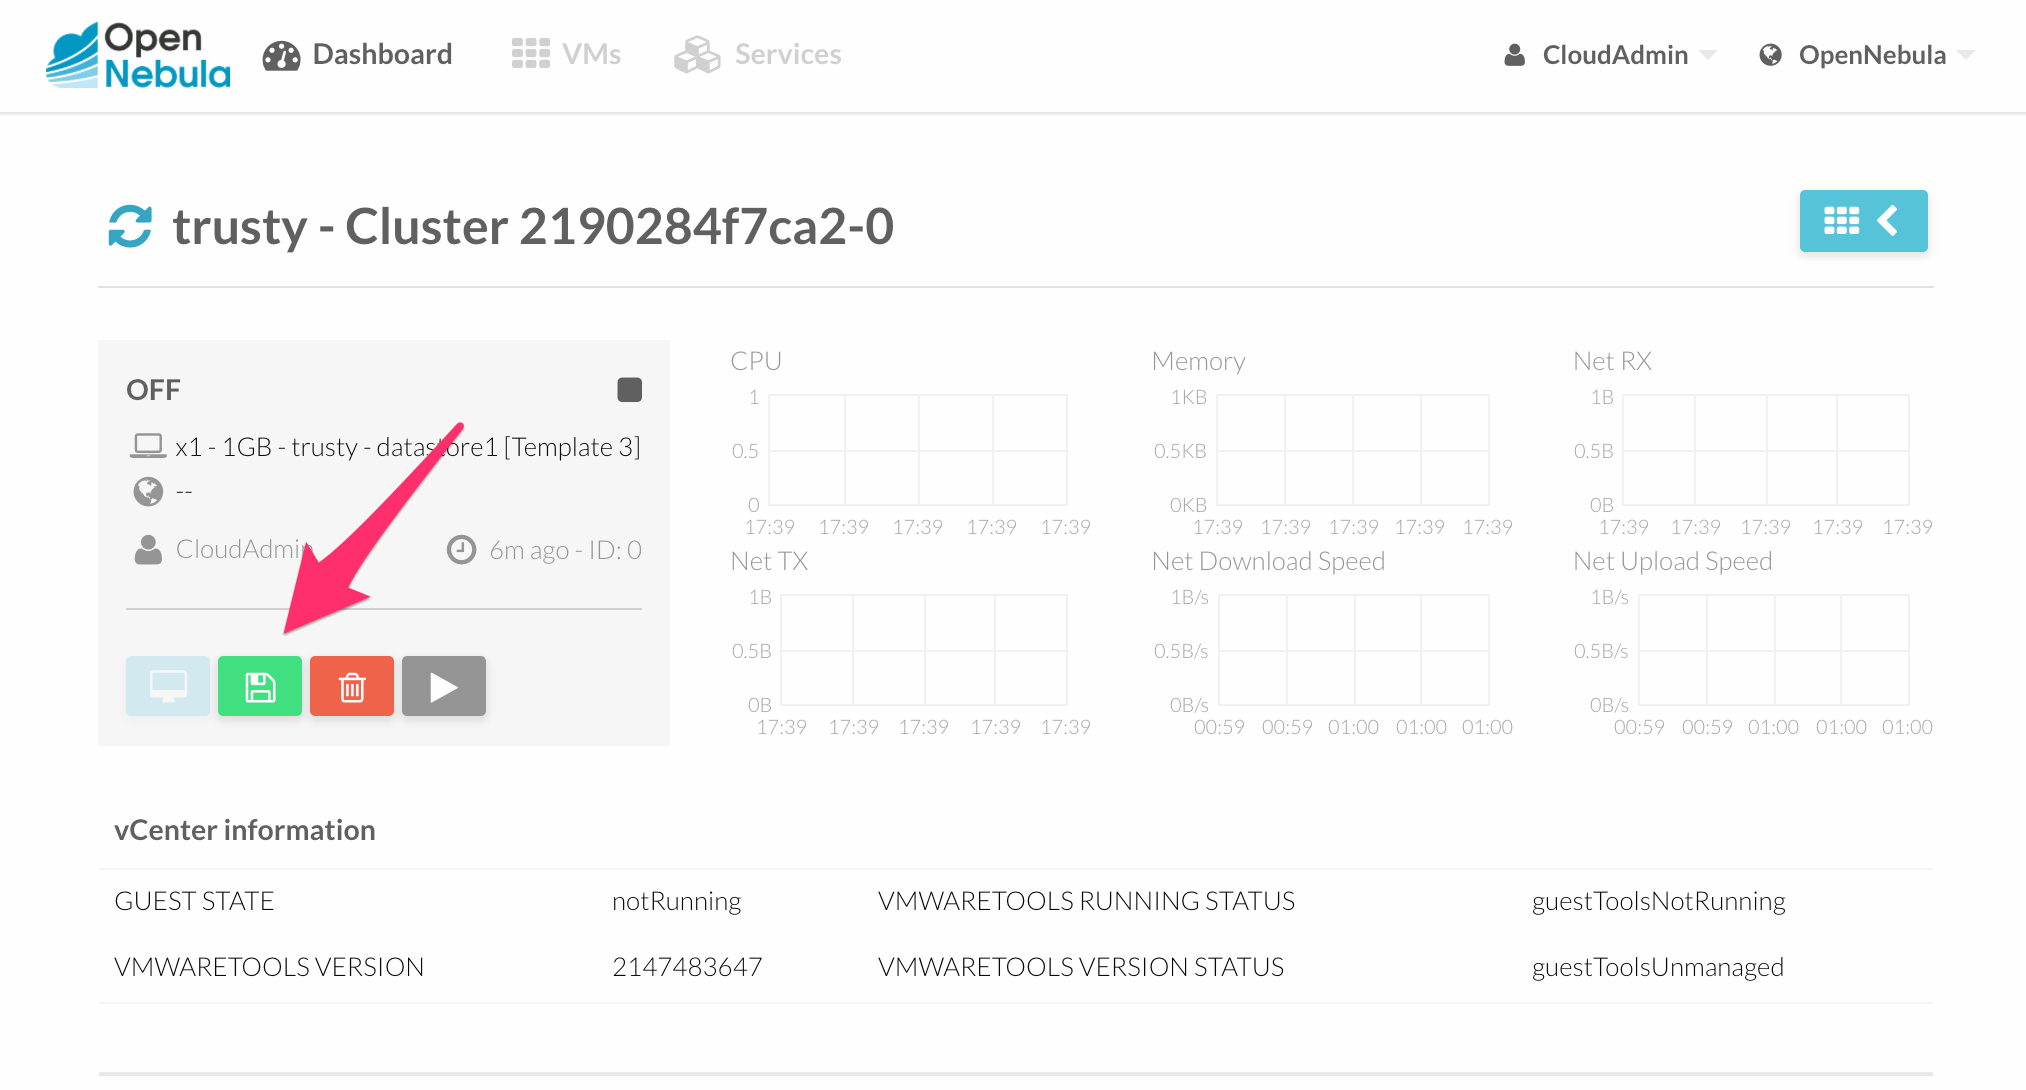
Save as Template
After a VM has been launched, end users in Cloud View can chose to save a VM into a VM Template, provided the VM is in poweroff state. A new VM Template will be created that, upon instantation, will hold all the changes performed to the original VM at the time of hitting the Save As Template button.
VM Placement - Folders
In OpenNebula, by default, a new virtual machine cloned from a vCenter template will be displayed in the same folder where the template lives in vSphere’s VM and Templates inventory. However you have the chance to select in which folder you want to see the VM’s based on that template.
For example, if you have the following directory tree and you want VMs to be placed in the VMs folder under Management, the path to that folder from the datacenter root would be /Management/VMs. You can use that path in different vOneCloud actions e.g when a template is imported.

Disk Resize
VM disks can be resized at booth time of the VM, or when the VM is powered off.

Disk Save As
VM Disks can be saved as images for later use when the VMs are powered off, the option is present upon clicking a particualr VM and proceeding to the Storage subtab.
Linked Clones
In vOneCloud, a new VM is deployed when a clone of an existing vCenter template is created, that’s why vOneCloud requires that templates are first created in vCenter and then imported into vOneCloud.
In VMWare there are two types of cloning operations:
- The Full Clone. A full clone is an independent copy of a template that shares nothing with the parent template after the cloning operation. Ongoing operation of a full clone is entirely separate from the parent template. This is the default clone action in OpenNebula.
- The Linked Clone. A linked clone is a copy of a template that shares virtual disks with the parent template in an ongoing manner. This conserves disk space, and allows multiple virtual machines to use the same software installation.
In order to activate the linked clones functionality VM Templates must be imported through the ‘’onevcenter’’ command line tool, as this functionality is not present through the web interface. To achieve this login into the appliance and then use the onevcenter tool as described here, answerying ‘’yes’’ when prompted if you want to use linked clones. This operation will modify the template so you may prefer that OpenNebula creates a copy of the template and modify that template instead, the onevcenter tool will allow you to choose what you prefer to do.
Warning
Linked clone disks cannot be resized.
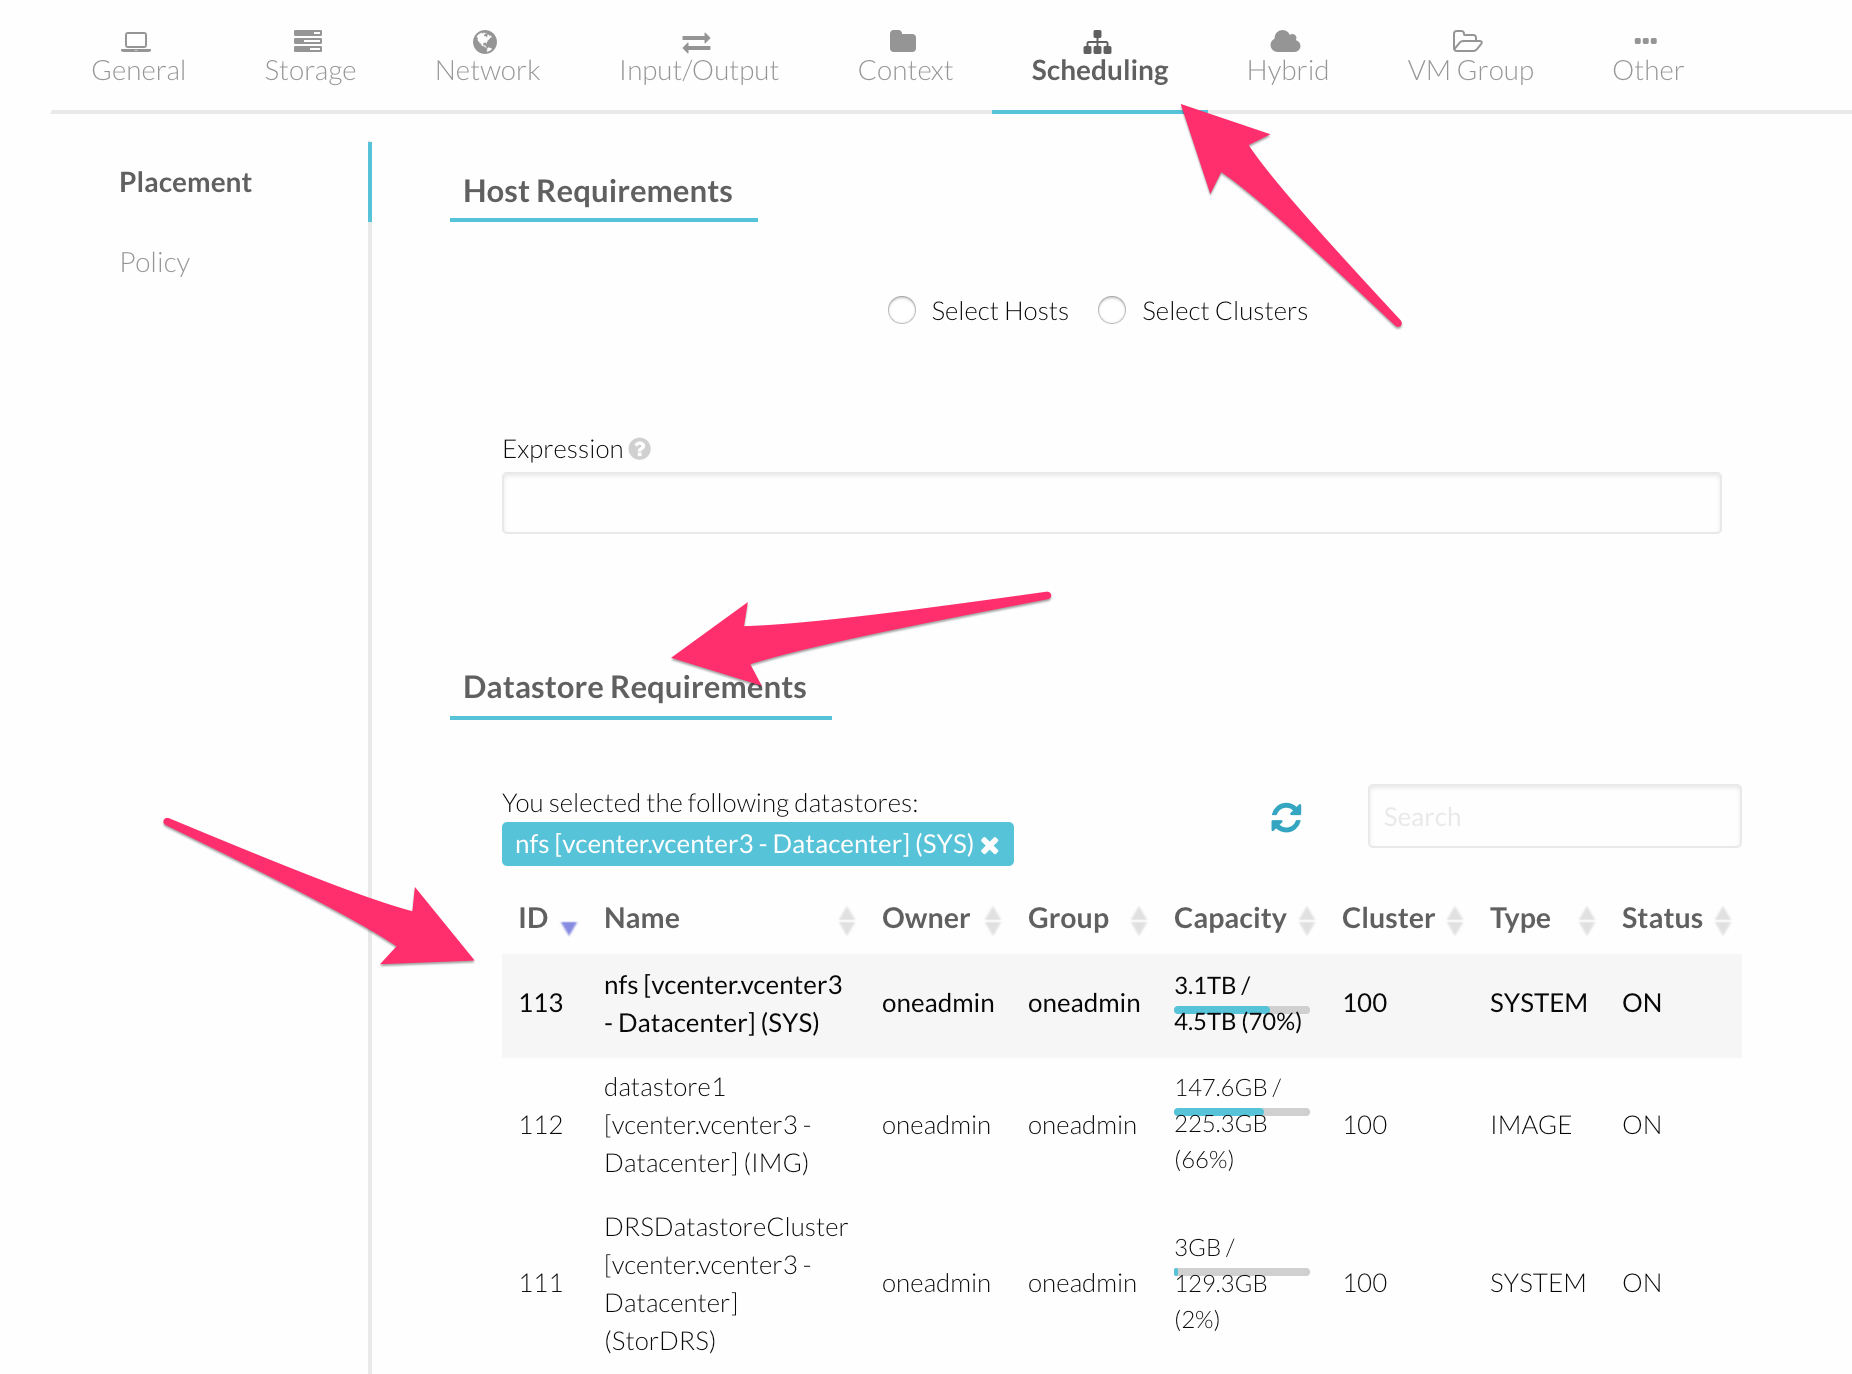
Select Datastore
The vOneCloud scheduler will pick a valid datastore for a VM, unless the VM Template defines a datastore. To assign a VM Template to a datastore, proceed to the Scheduling tab on the VM Template update dialog and select the desire datastore in the Datastore requirements section.
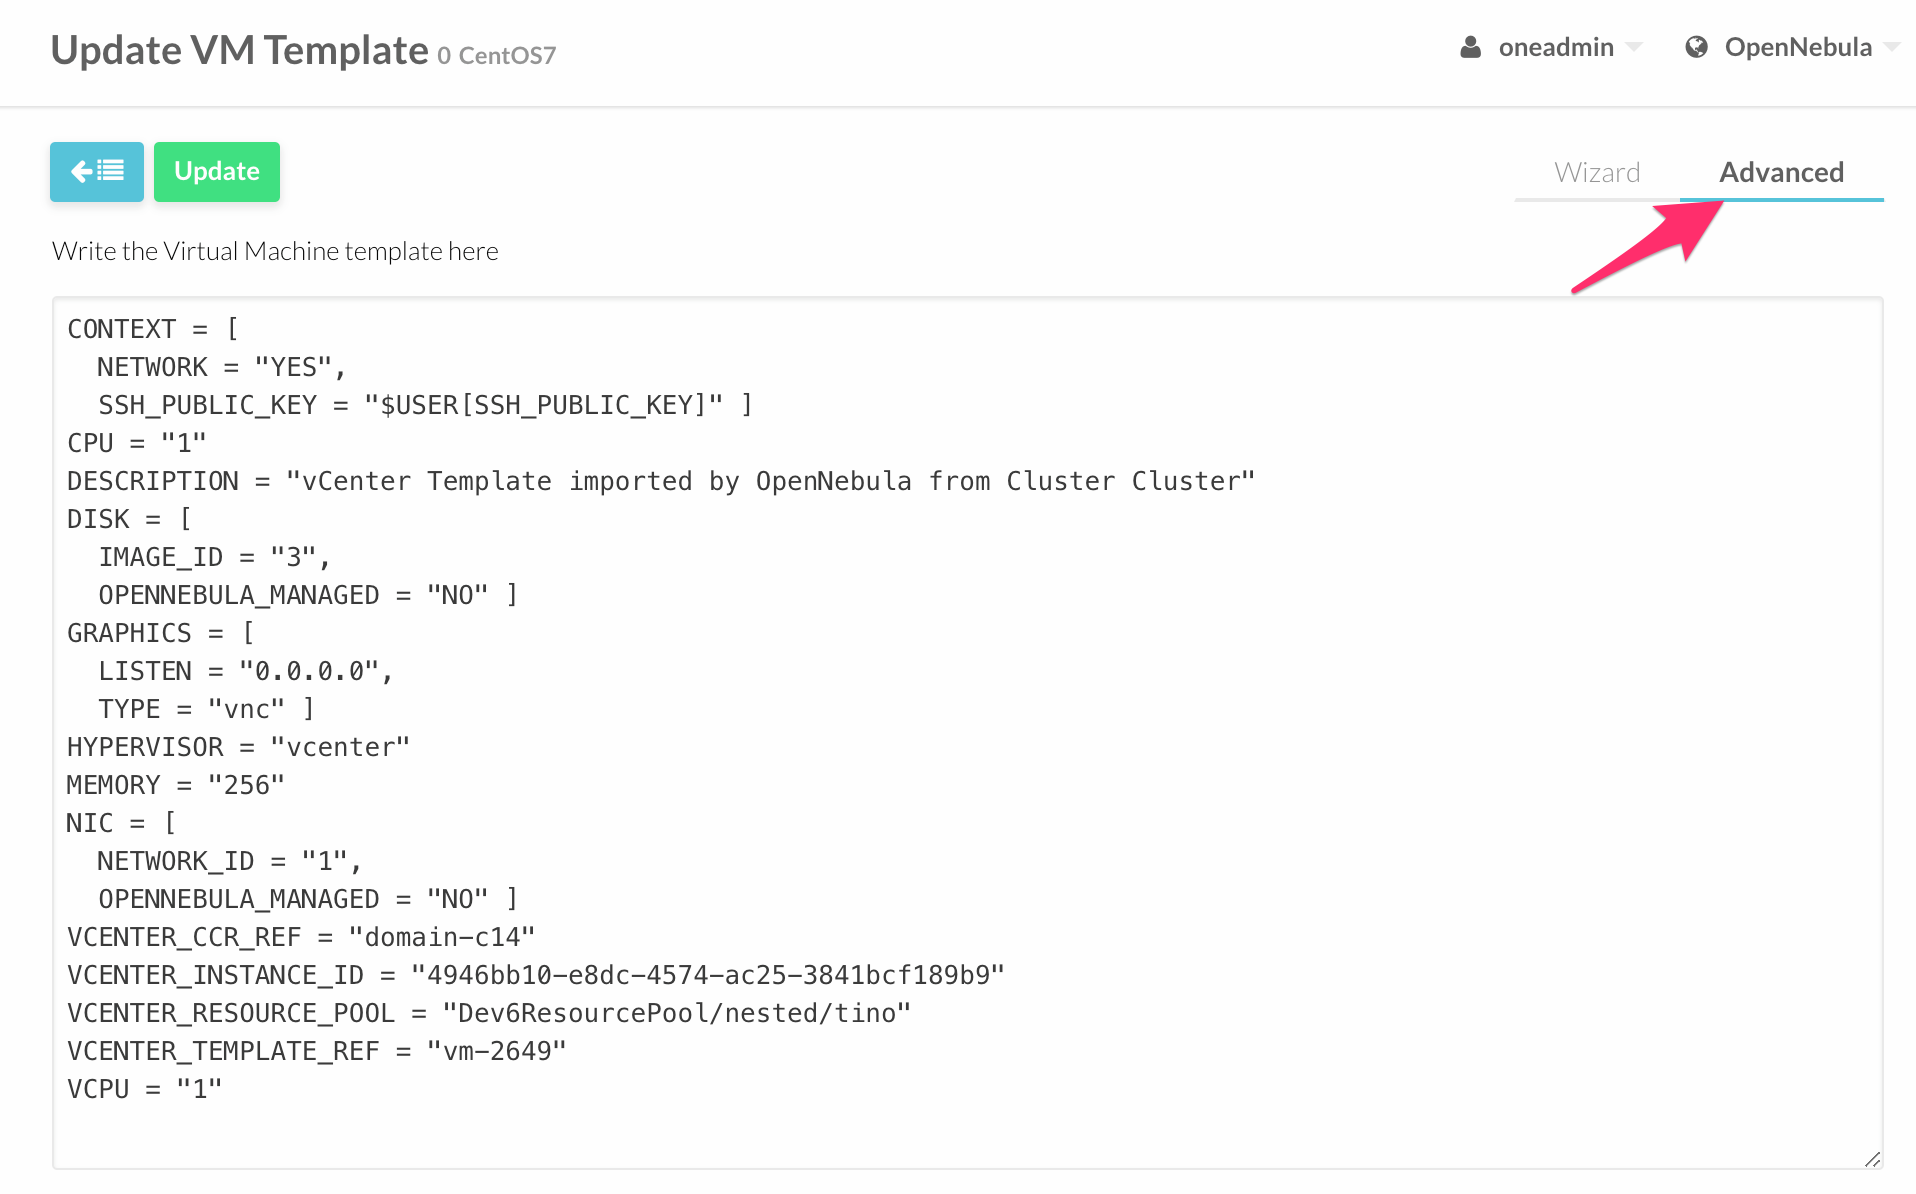
Advanced VM Template Editing
The Advanced tab in the VM Template creation / update dialog of vOneCloud, can be used to quickly edit any aspect of the VM Template. The list of attributes that can be used to create / update vOneCloud VM Templates through the Advanced tab follows:
| Attribute | Meaning |
| CPU | Physical CPUs to be used by the VM. This does not have to relate to the CPUs used by the vCenter VM Template, OpenNebula will change the value accordingly |
| MEMORY | Physical Memory in MB to be used by the VM. This does not have to relate to the CPUs used by the vCenter VM Template, OpenNebula will change the value accordingly |
| NIC | Valid MODELs are: virtuale1000, virtuale1000e, virtualpcnet32, virtualsriovethernetcard, virtualvmxnetm, virtualvmxnet2, virtualvmxnet3. |
| GRAPHICS | Multi-value - Only VNC supported. |
| SCHED_REQUIREMENTS | NAME=”name of the vCenter cluster where this VM Template can instantiated into a VM”. |
| CONTEXT | All sections will be honored except FILES |
| VCENTER_RESOURCE_POOL | By default, VM will be deployed to the default Resource Pool. This attribute allows to set the name of the resource pool where this VM will be deployed. This can be overwritten explicitly at deployment time from the CLI or Sunstone. More information here <resource_pool>. |
VM Dynamic Reconfiguration
The following operations can be performed on a running or powered off VM, and the changes will be applied dynamically to the VM:
- Change CPU
- Change Memory
- Add/Remove disks
- Add/Remove NICs
- Change contextualization values
Add New Network/Distributed vSwitch
Virtual Networks from vCenter can be represented using vOneCloud virtual networks, where a one-to-one relationship exists between an vOneCloud’s virtual network and a vSphere’s port group. When adding NICs in a VM template or when attaching a NIC (hot-plugging) to a running VM in vOneCloud, a network interface can be attached to an vOneCloud’s Virtual Network.
vCenter Networks/Distributed vSwitches for a particular vCenter cluster can be imported in vOneCloud after the cluster is imported using the same procedure to import vCenter clusters, making use of the Import button in the Network --> Virtual Networks tab in the vCenter View.
Also, these two kind of networks can be created from vOneCloud.
Creating Port Groups from vOneCloud
This is the workflow when you want vOneCloud to create a vCenter network, regardless of it being a standard or distributed one:
- Create a new OpenNebula Virtual Network template. Add the required attributes to the template including the vOneCloud’s Host ID which represents the vCenter cluster where the network elements will be created.
- When the Virtual Network is created, vOneCloud will create the network elements required on each ESX host that are members of the specified vCenter cluster.
- The Virtual Network will be automatically assigned to the vOneCloud cluster which includes the vCenter cluster represented as an vOneCloud host.
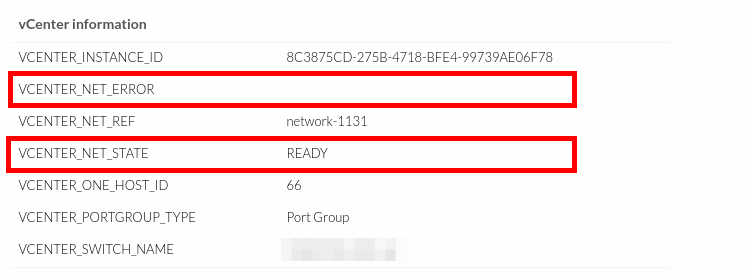
- vOneCloud network creation works asynchronously so you may have to refresh the Virtual Network information until you find the VCENTER_NET_STATE attribute. If it completes the actions successfully that attribute will be set to READY and hence you can use it from VMs and templates. If the network creation task fails VCENTER_NET_STATE will be set to ERROR and the VCENTER_NET_ERROR attribute will offer more information.
- When a Virtual Network is removed, for each ESX host found in the vCenter cluster assigned to the template, vOneCloud removes both the port group and the switch. If the switch has no more port groups left then the switch will be removed too.
Warning
If a port group or switch is in use e.g a VM is running and have a NIC attached to that port group the remove operation will fail so please ensure that you have no VMs or templates using that port group before trying to remove the Virtual Network representation.
Note
You’ll need to enable the network hooks for network creation to work.
vCenter Network attributes
Here’s the table with the attributes that a virtual network representation in vOneCloud understands:
| Attribute | Type | Mandatory | Description |
|---|---|---|---|
VN_MAD |
string | Yes | Must be set to vcenter |
BRIDGE |
string | Yes | It’s the port group name. |
PHYDEV |
string | No | If you want to assign uplinks to your switch you can specify the names of the physical network interface cards of your ESXi hosts that will be used. You can use several physical NIC names using a comma between them e.g vmnic0,vmnic1. Note that two switches cannot share the same physical nics and that you must be sure that the same physical interface name exists and it’s available for every ESX host in the cluster. This attribute will be ignored if the switch already exists. |
VCENTER_PORTGROUP_TYPE |
string | Yes | There are two possible values Port Group and Distributed Port Group. Port Group means a Standard Port Group |
VCENTER_ONE_HOST_ID |
integer | Yes | The OpenNebula host id which represents the vCenter cluster where the nework will be created. |
VCENTER_SWITCH_NAME |
string | Yes | The name of the virtual switch where the port group will be created. If the vcenter switch already exists it won’t update it to avoid accidental connectivity issues |
VCENTER_SWITCH_NPORTS |
integer | No | The number of ports assigned to a virtual standard switch or the number of uplink ports assigned to the Uplink port group in a Distributed Virtual Switch. This attribute will be ignored if the switch already exists. |
MTU |
integer | No | The maximum transmission unit setting for the virtual switch. This attribute will be ignored if the switch already exists. |
VLAN_ID |
integer | Yes (unless AUTOMATIC_VLAN_ID) |
The VLAN ID, will be generated if not defined and AUTOMATIC_VLAN_ID is set to YES |
AUTOMATIC_VLAN_ID |
boolean | Yes (unless VLAN_ID) |
Mandatory and must be set to YES if VLAN_ID hasn’t been defined so OpenNebula created a VLAN ID automatically |
OpenNebula uses the following values when creating virtual switches and port groups in vCenter according to what the vSphere’s Web Client uses in the same operations:
- VLAN ID is set to 0, which means that no VLANs are used.
- MTU value is set to 1500.
Standard port groups created by OpenNebula have the following settings:
- Number of ports is set to Elastic. According to VMWare’s documentation, the Elastic mode is used to ensure efficient use of resources on ESXi hosts where the ports of virtual switches are dynamically scaled up and down. In any case, the default port number for standard switches is 128.
- Security - Promiscuous mode is set to Reject, which means that the virtual network adapter only receives frames that are meant for it.
- Security - MAC Address Changes is set to Accept, so the ESXi host accepts requests to change the effective MAC address to other than the initial MAC address.
- Security - Forged transmits is set to Accept, which means that the ESXi host does not compare source and effective MAC addresses.
- Traffic Shaping policies to control the bandwidth and burst size on a port group are disabled. You can still set QoS for each NIC in the template.
- Physical NICs. The physical NICs used as uplinks are bridged in a bond bridge with teaming capabilities.
Distributed port groups created by OpenNebula have the following settings:
- Number of ports is set to Elastic. According to VMWare’s documentation, the Elastic mode is used to ensure efficient use of resources on ESXi hosts where the ports of virtual switches are dynamically scaled up and down. The default port number for distributed switches is 8.
- Static binding. When you connect a virtual machine to a distributed port group, a port is immediately assigned and reserved for it, guaranteeing connectivity at all times. The port is disconnected only when the virtual machine is removed from the port group.
- Auto expand is enabled. When the port group is about to run out of ports, the port group is expanded automatically by a small predefined margin.
- Early Bindind is enabled. A free DistributedVirtualPort will be selected to assign to a Virtual Machine when the Virtual Machine is reconfigured to connect to the port group.
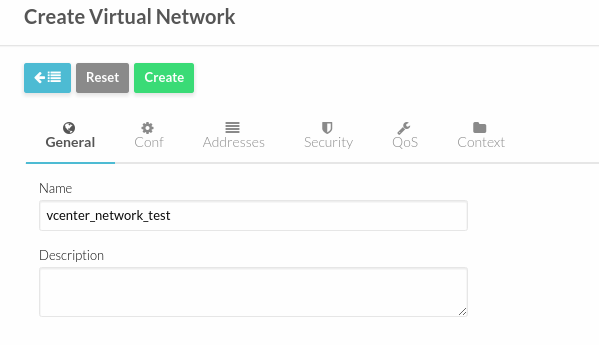
A sample session to create a Virtual Network follow. The first step requires you to introduce the virtual network’s name:
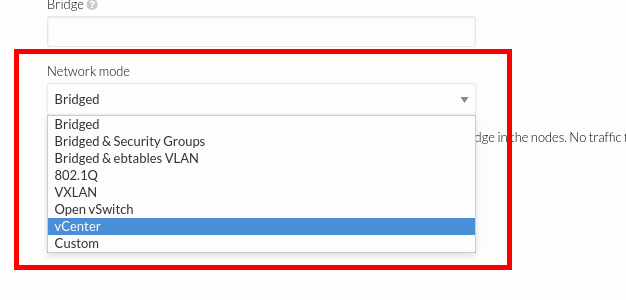
In the Conf tab, select vCenter from the Network Mode menu, so the vcenter network driver is used (the VN_MAD=vcenter attribute will be added to OpenNebula’s template). The Bridge name will be the name of the port group, and by default it’s the name of the Virtual Network but you can choose a different port group name.
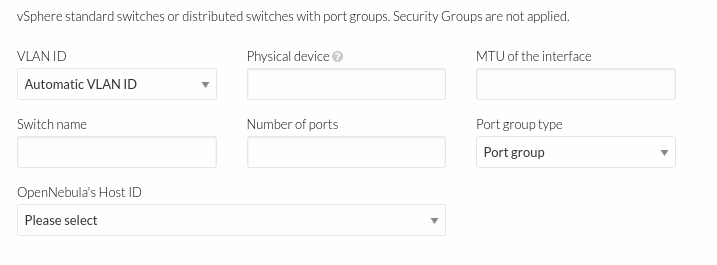
Once you’ve selected the vCenter network mode, Sunstone will show several network attributes that can be defined.
Address Ranges
Several different Address Ranges can be added as well in the Virtual Network creation and/or Update dialog, pretty much in the same way as it can be done at the time of acquiring the resources explained in the Import vCenter guide.
Traffic Shaping
In order to get VM traffic shaping to work, the NIC must be controlled by vOneCloud and it needs to be connected to a Distributed vSwitch. The following requirements also needs to be met:
- Verify that vSphere Distributed Switch is version 6.0.0 and later.
- Verify that Network I/O Control on the switch is version 3.
- Verify that Network I/O Control is enabled.
- Verify that the virtual machine system traffic has a configured bandwidth reservation.
Steps to achieve the above configuration can be found here
Four values can be used in both the Virtual Network Template or the NIC to achieve traffic shaping. Take into account that only total traffic (inbound and outbound) is limited, the minimum between inbound and outbound is picked.
- Minimum between INBOUND_AVG_BW and OUTBOUND_AVG_BW. Expressed in kilobytes/second, this value is used to set the Reservation. This value cannot be set to a greater value than the Peak_BW.
- Minimum between INBOUND_PEAK_BW and OUTBOUND_PEAK_BW. Expressed in kilobytes/second, this value is used to set the limit, or maximum bitrate for the interface of the VM. This value cannot be less than 1024 kilobytes/second.
Network Monitoring
vOneCloud gathers network monitoring info for each VM. Real-time data is retrieved from vCenter thanks to the Performance Manager which collects data every 20 seconds and maintains it for one hour. Real-time samples are used so no changes have to be applied to vCenter’s Statistics setings. Network metrics for transmitted and received traffic are provided as an average using KB/s unit.
The graphs provided by Sunstone are different from those found in vCenter under the Monitor -> Performance Tab when selecting Realtime in the Time Range drop-down menu or in the Advanced view selecting the Network View. The reason is that Sunstone uses polling time as time reference while vCenter uses sample time on their graphs, so an approximation to the real values aggregating vCenter’s
Add New Datastore
Datastores for a particular vCenter cluster can be imported in vOneCloud after the cluster is imported using the same procedure to import vCenter clusters, making use of the Import button in the Storage --> Datastores tab.
In order to create a OpenNebula vCenter datastore that represents a vCenter VMFS datastore, a new OpenNebula datastore needs to be created with the following attributes. This can be achieved using the ‘+’ sign in Storage --> Datastores tab.
| Attribute | Description |
|---|---|
DS_MAD |
Must be set to vcenter if TYPE is SYSTEM_DS |
TM_MAD |
Must be set vcenter |
TYPE |
Must be set to SYSTEM_DS or IMAGE_DS |
VCENTER_ADAPTER_TYPE |
Default adapter type used by virtual disks to plug inherited to VMs for the images in the datastore. It is inherited by images and can be overwritten if specified explicitly in the image. Possible values (careful with the case): lsiLogic, ide, busLogic. More information in the VMware documentation. Known as “Bus adapter controller” in Sunstone. |
VCENTER_DISK_TYPE |
Type of disk to be created when a DATABLOCK is requested. This value is inherited from the datastore to the image but can be explicitly overwritten. The type of disk has implications on performance and occupied space. Values (careful with the case): delta,eagerZeroedThick,flatMonolithic,preallocated,raw,rdm,rdmp,seSparse,sparse2Gb,sparseMonolithic,thick,thick2Gb,thin. More information in the VMware documentation. Known as “Disk Provisioning Type” in Sunstone. |
VCENTER_DS_REF |
Managed Object Reference of the vCenter datastore. Please visit the Managed Object Reference section to know more about these references. |
VCENTER_DC_REF |
Managed Object Reference of the vCenter datacenter. Please visit the Managed Object Reference section to know more about these references. |
VCENTER_INSTANCE_ID |
The vCenter instance ID. Please visit the Managed Object Reference section to know more about these references. |
VCENTER_HOST |
Hostname or IP of the vCenter host |
VCENTER_USER |
Name of the vCenter user. |
VCENTER_PASSWORD |
Password of the vCenter user. It’s encrypted when the datastore template is updated using the secret stored in the /var/lib/one/.one/one_key an |
VCENTER_DS_IMAGE_DIR |
(Optional) Specifies what folder under the root directory of the datastore will host persistent and non-persistent images e.g one |
VCENTER_DS_VOLATILE_DIR |
(Optional) Specifies what folder under the root directory of the datastore will host the volatile disks |
All OpenNebula datastores are actively monitoring, and the scheduler will refuse to deploy a VM onto a vCenter datastore with insufficient free space.
Add New Images / CDROMS
Adding a new datastore and representing existing VMDK images enables disk attach/detach functionality.
There are three ways of adding VMDK representations in vOneCloud:
- Upload a new VMDK from the local filesystem
- Register an existent VMDK image already in the datastore
- Create a new empty datablock
vCenter VM Templates with already defined disks will be imported without this information in vOneCloud. These disks will be invisible for vOneCloud, and therefore cannot be detached from the VMs. The imported Templates in vOneCloud can be updated to add new disks from VMDK images imported from vCenter (please note that these will always be persistent).
The following image template attributes need to be considered for vCenter VMDK image representation in vOneCloud:
| Attribute | Description |
|---|---|
PERSISTENT |
At the time of instantiating a VM with a disk using this image as backing, wheter vOneCloud will copy this image (Set to NO) or if the original will be used (Set to YES) |
PATH |
This can be either:
|
ADAPTER_TYPE |
Possible values (careful with the case): lsiLogic, ide, busLogic. More information in the VMware documentation. Known as “Bus adapter controller” in Sunstone. |
DISK_TYPE |
The type of disk has implications on performance and occupied space. Values (careful with the case): delta,eagerZeroedThick,flatMonolithic,preallocated,raw,rdm,rdmp,seSparse,sparse2Gb,sparseMonolithic,thick,thick2Gb,thin. More information in the VMware documentation |
VMDK images in vCenter datastores can be:
- Cloned
- Deleted
- Hotplugged to VMs