Add New vCenter Resources
vOneCloud can manage an unlimited number of vCenters. Each vCenter is going to be represented by an vOneCloud host, which in turn abstracts all the ESX hosts managed by that particular instance of vCenter.
The suggested usage is to build vOneCloud templates for each VM Template in each vCenter. The built in scheduler in vOneCloud will decide which vCenter has the VM Template needed to launch the VM.
It is important to note that there are different behavior of the vCenter resources when deleted in OpenNebula. The following resources are NOT deleted in vCenter when deleted in OpenNebula:
- VM Templates
- Networks
- Datastores
The following resource are deleted in vCenter when deleted in OpenNebula:
- Images
- Virtual Machines
Add New vCenter Cluster
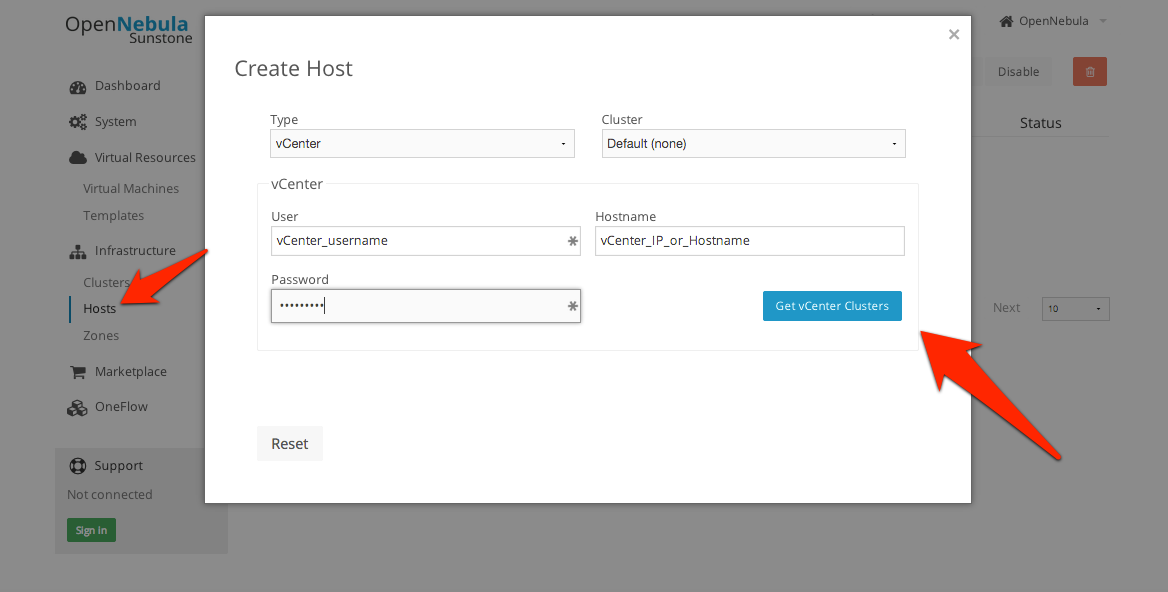
The mechanism to add a new vCenter is exactly the same as the one used to import the first one into vOneCloud. It can be performed graphically from the vCenter View:
Note
vOneCloud will create a special key at boot time and save it in /var/lib/one/.one/one_key. This key will be used as a private key to encrypt and decrypt all the passwords for all the vCenters that vOneCloud can access. Thus, the password shown in the vOneCloud host representing the vCenter is the original password encrypted with this special key.
Add New / Update VM Template
Let’s see an example:
To avoid misunderstandings, there are two VM templates we will refer to: the vOneCloud VM Templates and the vCenter VM Templates. The formers are created in the vOneCloud web interface (Sunstone), whereas the latter are created directly through the vCenter Web Client.
A cloud administrator builds two vOneCloud templates to represent one vCenter VM Template available in vCenterA and another available in vCenterB. As previous work, the cloud administrator creates two vCenter VM templates, one in each vCenter.
To create a vOneCloud VM Template representing a vCloud VM Template, you have to choices:
- Import an existing vCenter VM Template
- Create a new VM Template manually providing a reference to a vCenter VM Template
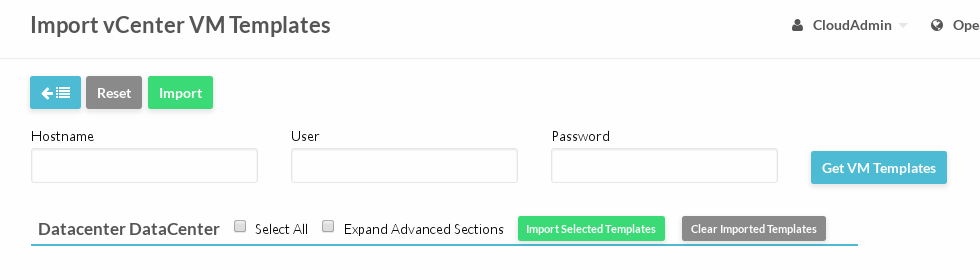
You can import a vCloud VM Template using the Import button and providing your vCenter’s hostname or IP address and the credentials for a user with the required privileges. Then, select the templates you want to import and click the Import Selected Templates button.
If you want to create the vOneCloud VM Template manually, log in into Sunstone as CloudAdmin user as in explained here, proceed to the
Templates -> VMs, and click on the + sign. Select vCenter as the hypervisor, and type in the vCenter Template UUID. You can also set a capacity (CPU and Memory) that would be honored at the time of instantiating the VM. In the Scheduling tab you can select the hostname of the specific vCenter. The Context tab allows to pass information onto the VM to tailor it for its final use (read more about it here). In Network tab a valid Virtual Network (see below) can added to the VM, possible values for the MODEL type of the network card are:
- virtuale1000
- virtuale1000e
- virtualpcnet32
- virtualsriovethernetcard
- virtualvmxnetm
- virtualvmxnet2
- virtualvmxnet3

Fill in with UUID uuidA in and select host vCenterA. Repeat for vCenterB.
If a user instantiates one of these templates, the vOneCloud scheduler will pick the right vCenter in which to instantiate the VM Template.
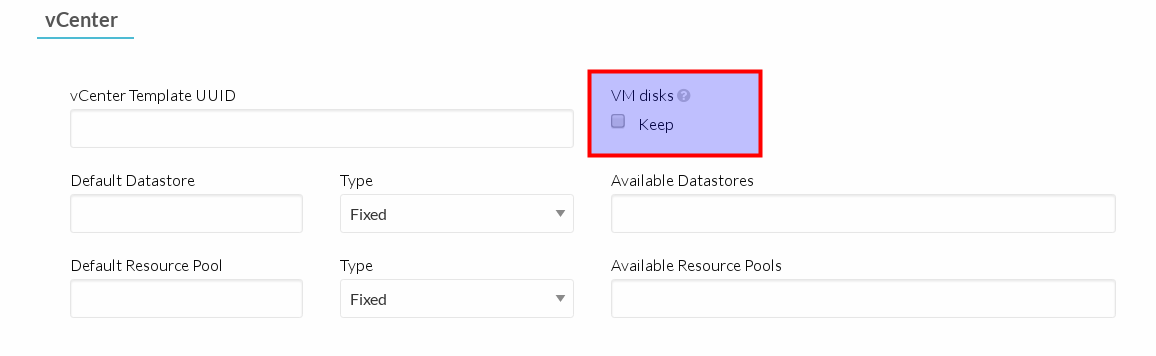
The variable KEEP_DISKS_ON_DONE can be used in the VM template to instruct vOneCloud not to erase the VM disks after it enters the DONE state (either through shutdown or cancel).
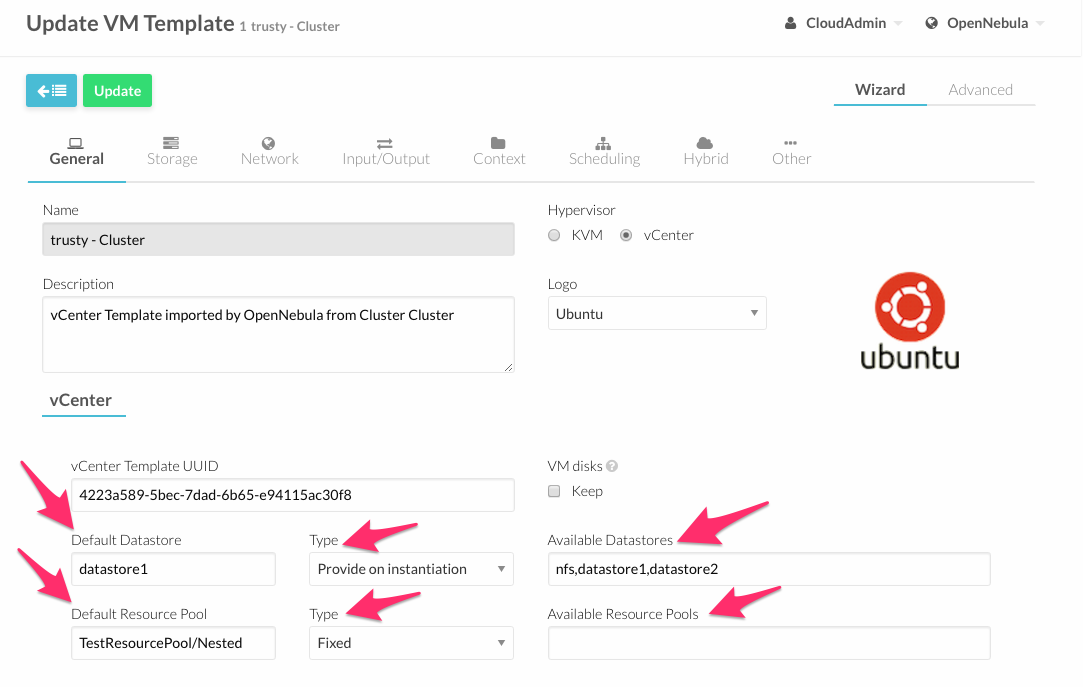
Using the automated process for importing vCenter infrastructures, vOneCloud will generate the above template for you at the time of importing vCenter.
Datastore and Resource Pool where a VM is going to be deployed to can be modified from the VM Template. These attributes can be set in two ways in the vOneCloud VM Template, and can be set/modified at the time of creating/updating the VM Template in vOneCloud:
- Fixed: Pick a certain Resource Pool / Datastore where this VM will be contained
- Delegated to User: Provide a comma separated list of the different Resource Pools / Datastores available for this VM Template, that the end user will be able to chose at VM launch time. A default can be selected.
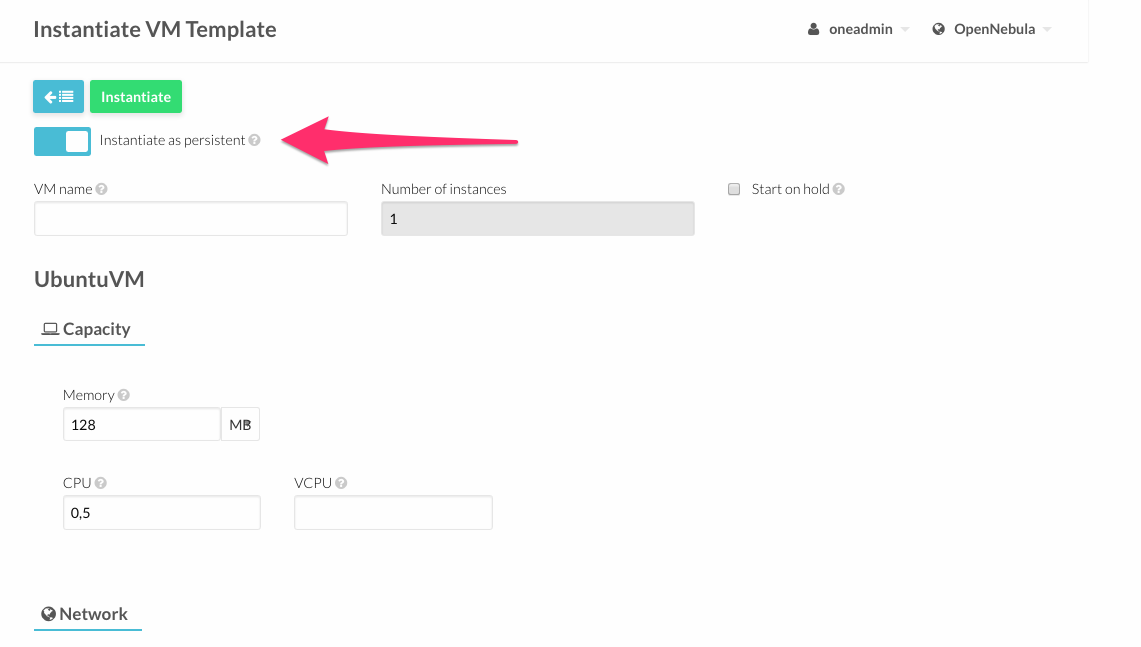
VM Instantiate to Persistent
At the time of deploying a VM Template, a flag can be used to create a new VM Template out of the VM.
Whenever the VM life-cycle ends, vOneCloud will instruct vCenter to create a new vCenter VM Template out of the VM, with the settings of the VM including any new disks or network interfaces added through vOneCloud. Any new disk added to the VM will be saved as part of the template, and when a new VM is spawned from this new VM Template the disk will be cloned by vOneCloud (ie, it will no longer be persistent).
This functionality is very useful to create new VM Templates from a original VM Template, changing the VM configuration and/or installing new software, to create a complete VM Template catalog.
Note
A new vOneCloud VM Template will be created pointing to this new VM Template, so it can be instantiated through vOneCloud. This new vOneCloud VM Template will be pointing to the original template until the VM is shutdown, at which point it will be converted to a vCenter VM Template and the vOneCloud VM Template updated to point to this new vCentre VM Template.
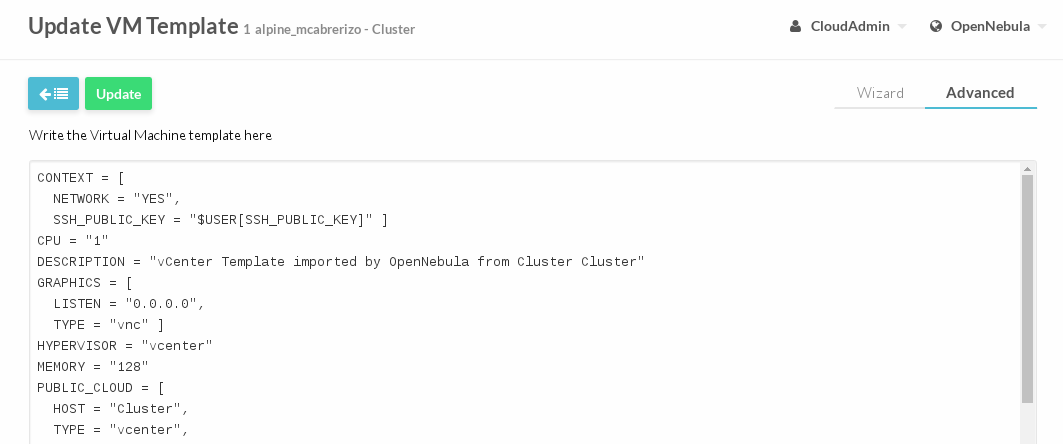
Advanced VM Template Editing
The Advanced tab in the VM Template creation / update dialog of vOneCloud, can be used to quickly edit any aspect of the VM Template. The list of attributes that can be used to create / update vOneCloud VM Templates through the Advanced tab follows:
| Attribute | Meaning |
| CPU | Physical CPUs to be used by the VM. This does not have to relate to the CPUs used by the vCenter VM Template, OpenNebula will change the value accordingly |
| MEMORY | Physical Memory in MB to be used by the VM. This does not have to relate to the CPUs used by the vCenter VM Template, OpenNebula will change the value accordingly |
| NIC | Valid MODELs are: virtuale1000, virtuale1000e, virtualpcnet32, virtualsriovethernetcard, virtualvmxnetm, virtualvmxnet2, virtualvmxnet3. |
| GRAPHICS | Multi-value - Only VNC supported. |
| PUBLIC_CLOUD | Multi-value. TYPE must be set to vcenter, VM_TEMPLATE must point to the uuid of the vCenter VM that is being represented and HOST must refer to the name of the vCenter Cluster (represented by a vOneCloud host) where the template is available |
| SCHED_REQUIREMENTS | NAME=”name of the vCenter cluster where this VM Template can instantiated into a VM”. |
| CONTEXT | All sections will be honored except FILES |
| KEEP_DISKS_ON_DONE | (Optional) Prevent OpenNebula from erasing the VM disks upon reaching the done state (either via shutdown or cancel) |
| VCENTER_DATASTORE | By default, VM will be deployed to the datastore where the VM Template is bound to. This attribute allows to set the name of the datastore where this VM will be deployed. This can be overwritten explicitly at deployment time from the CLI or Sunstone |
| RESOURCE_POOL | By default, VM will be deployed to the default Resource Pool. This attribute allows to set the name of the resource pool where this VM will be deployed. This can be overwritten explicitly at deployment time from the CLI or Sunstone. More information here <resource_pool>. |
VM Dynamic Reconfiguration
The following operations can be performed on a running or powered off VM, and the changes will be applied dynamically to the VM:
- Change CPU
- Change Memory
- Add/Remove disks
- Add/Remove NICs
- Change contextualization values
Add New Network/Distributed vSwitch
vCenter Networks/Distributed vSwitches for a particular vCenter cluster can be imported in vOneCloud after the cluster is imported using the same procedure to import vCenter clusters, making use of the Import button in the Network --> Virtual Networks tab in the vCenter View.
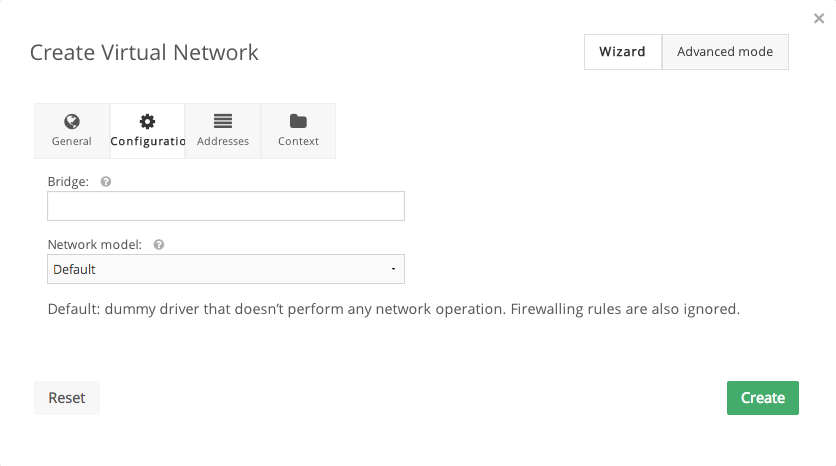
A representation of a vCenter Network or Distributed vSwitch can be created in vOneCloud by creating a Virtual Network and setting the BRIDGE property to exactly the same name as the vCenter Network. Leave “Default” network model if you don’t need to define VLANs for this network, otherwise chose the “VMware” network model.
Several different Address Ranges can be added as well in the Virtual Network creation and/or Update dialog, pretty much in the same way as it can be done at the time of acquiring the resources explained in the Import vCenter guide.
In order to get VM traffic shaping to work, the NIC must be controlled by vOneCloud and it needs to be connected to a Distributed vSwitch. The following requirements also needs to be met:
- Verify that vSphere Distributed Switch is version 6.0.0 and later.
- Verify that Network I/O Control on the switch is version 3.
- Verify that Network I/O Control is enabled.
- Verify that the virtual machine system traffic has a configured bandwidth reservation.
Steps to achieve the above configuration can be found here
Four values can be used in both the Virtual Network Template or the NIC to achieve traffic shaping. Take into account that only total traffic (inbound and outbound) is limited, the minimum between inbound and outbound is picked.
- Minimum between INBOUND_AVG_BW and OUTBOUND_AVG_BW. Expressed in kilobytes/second, this value is used to set the Reservation. This value cannot be set to a greater value than the Peak_BW.
- Minimum between INBOUND_PEAK_BW and OUTBOUND_PEAK_BW. Expressed in kilobytes/second, this value is used to set the limit, or maximum bitrate for the interface of the VM. This value cannot be less than 1024 kilobytes/second.
Add New Datastore
Datastores for a particular vCenter cluster can be imported in vOneCloud after the cluster is imported using the same procedure to import vCenter clusters, making use of the Import button in the Storage --> Datastores tab in the vCenter View.
In order to create an image in vOneCloud that represents a vCenter datastore, use the following parameters:
| Attribute | Description |
|---|---|
NAME |
Arbitrary name of the image |
PERSISTENT |
Must be set to ‘YES’ |
PATH |
Path of the VMDK file in the datastore. For instance, an image win10.vmdk in a Windows folder should be set to Windows/win10.vmdk |
ADAPTER_TYPE |
Possible values (careful with the case): lsiLogic, ide, busLogic. More information in the VMware documentation |
DISK_TYPE |
The type of disk has implications on performance and occupied space. Values (careful with the case): delta,eagerZeroedThick,flatMonolithic,preallocated,raw,rdm,rdmp,seSparse,sparse2Gb,sparseMonolithic,thick,thick2Gb,thin. More information in the VMware documentation |
The vCenter datastore in vOneCloud is tied to a vCenter OpenNebula host in the sense that all operations to be performed in the datastore are going to be performed through the vCenter instance associated to the vOneCloud host, which hold the needed credentials to access the vCenter instance.
Storage DRS and datastore cluster
Storage DRS allows you to manage the aggregated resources of a datastore cluster. A StoragePod data object aggregates the storage resources of associated Datastores in a datastore cluster managed by Storage DRS.
In OpenNebula, a StoragePod can be imported as a datastore using Sunstone or CLI’s onevcenter datastore command. The StoragePod will be imported as a SYSTEM datastore so it won’t be possible to use it to store images but it will be possible to deploy VMs on it.
Datastores which are member of the cluster, represented by the StoragePod, can be imported as individual IMAGE datastores where VMs can be deployed and images can be stored.
Current support has the following limitations:
- Images in StoragePods can’t be imported through Sunstone or CLI’s onevcenter command though it’s possible to import them from a datastore, which is a member of a storage cluster, if it has been imported previously as an individual datastore.
- New images like VMDK files cannot be created or uploaded to the StoragePod as it’s set as a SYSTEM datastore. However, it’s possible to create an image and upload it to a datastore which is a member of a storage cluster it has been imported previously as an individual datastore.
Warning
When a VM is deployed, a cloning operation is involved. The moveAllDisksBackingsAndDisallowSharing move type is used when target datastore is a StoragePod. According to VMWare’s documentation all of the virtual disk’s backings should be moved to the new datastore. It is not acceptable to attach to a disk backing with the same content ID on the destination datastore. During a clone operation any delta disk backings will be consolidated. The moveChildMostDiskBacking is used for datastores which are not StoragePods in the cloning operation.
Add New Images / CDROMS
Adding a new datastore and representing existing VMDK images enables disk attach/detach functionality.
vCenter VMDK images managed by vOneCloud are always persistent, ie, vOneCloud won’t copy them for new VMs, but rather the originals will be used. This means that only one VM can use one image at the same time.
There are three ways of adding VMDK representations in vOneCloud:
- Upload a new VMDK from the local filesystem
- Register an existent VMDK image already in the datastore
- Create a new empty datablock
vCenter VM Templates with already defined disks will be imported without this information in vOneCloud. These disks will be invisible for vOneCloud, and therefore cannot be detached from the VMs. The imported Templates in vOneCloud can be updated to add new disks from VMDK images imported from vCenter (please note that these will always be persistent).
The following image template attributes need to be considered for vCenter VMDK image representation in vOneCloud:
| Attribute | Description |
|---|---|
PERSISTENT |
Must be set to ‘YES’ |
PATH |
This can be either:
|
ADAPTER_TYPE |
Possible values (careful with the case): lsiLogic, ide, busLogic. More information in the VMware documentation. Known as “Bus adapter controller” in Sunstone. |
DISK_TYPE |
The type of disk has implications on performance and occupied space. Values (careful with the case): delta,eagerZeroedThick,flatMonolithic,preallocated,raw,rdm,rdmp,seSparse,sparse2Gb,sparseMonolithic,thick,thick2Gb,thin. More information in the VMware documentation |
VMDK images in vCenter datastores can be:
- Cloned
- Deleted
- Hotplugged to VMs
Import Running and Powered Off VMs
Running and Powered Off VMs can be imported through the WILDS tab in the Host info tab representing the vCenter cluster where the VMs are running in.
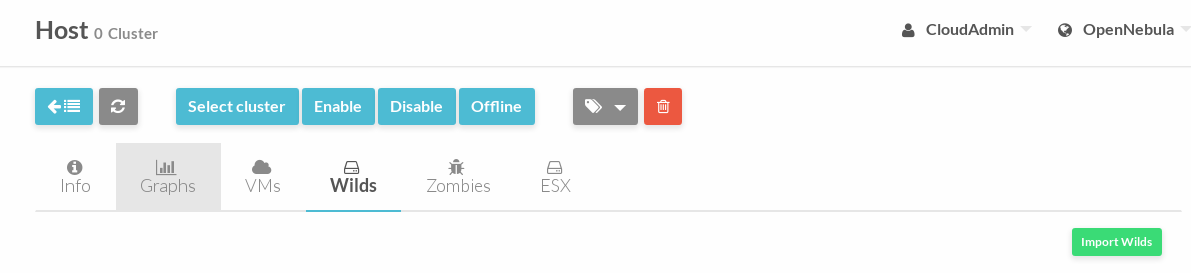
In the ZOMBIES tab you’ll find VMs that were launched from OpenNebula but, for whatever reason, OpenNebula is not aware of this, e.g coming from a different OpenNebula installation, or being managed from a different vOneCloud. Zombie VMs are meant to be a warning of a VM that need manual clean-up.
Read more about the vCenter drivers. Regarding the vCenter datastores in vOneCloud, refer to the vCenter datastore guide